Step 1: Browse and Choose a System
On the Lordhair homepage, click Hair Systems in the navigation bar to go to the product list. Then you can choose to personalize a stock hair system by base type.


If you're new to hair systems, you may feel overwhelmed about where to start. Base material, base size, hair density, hair color, and add-on services...there are a lot of choices to make. This guide breaks everything down step by step, so you can understand your options and feel more confident before placing your order.
Before placing an order, learning about a few basics will help you understand and choose a hair system that fits your needs.
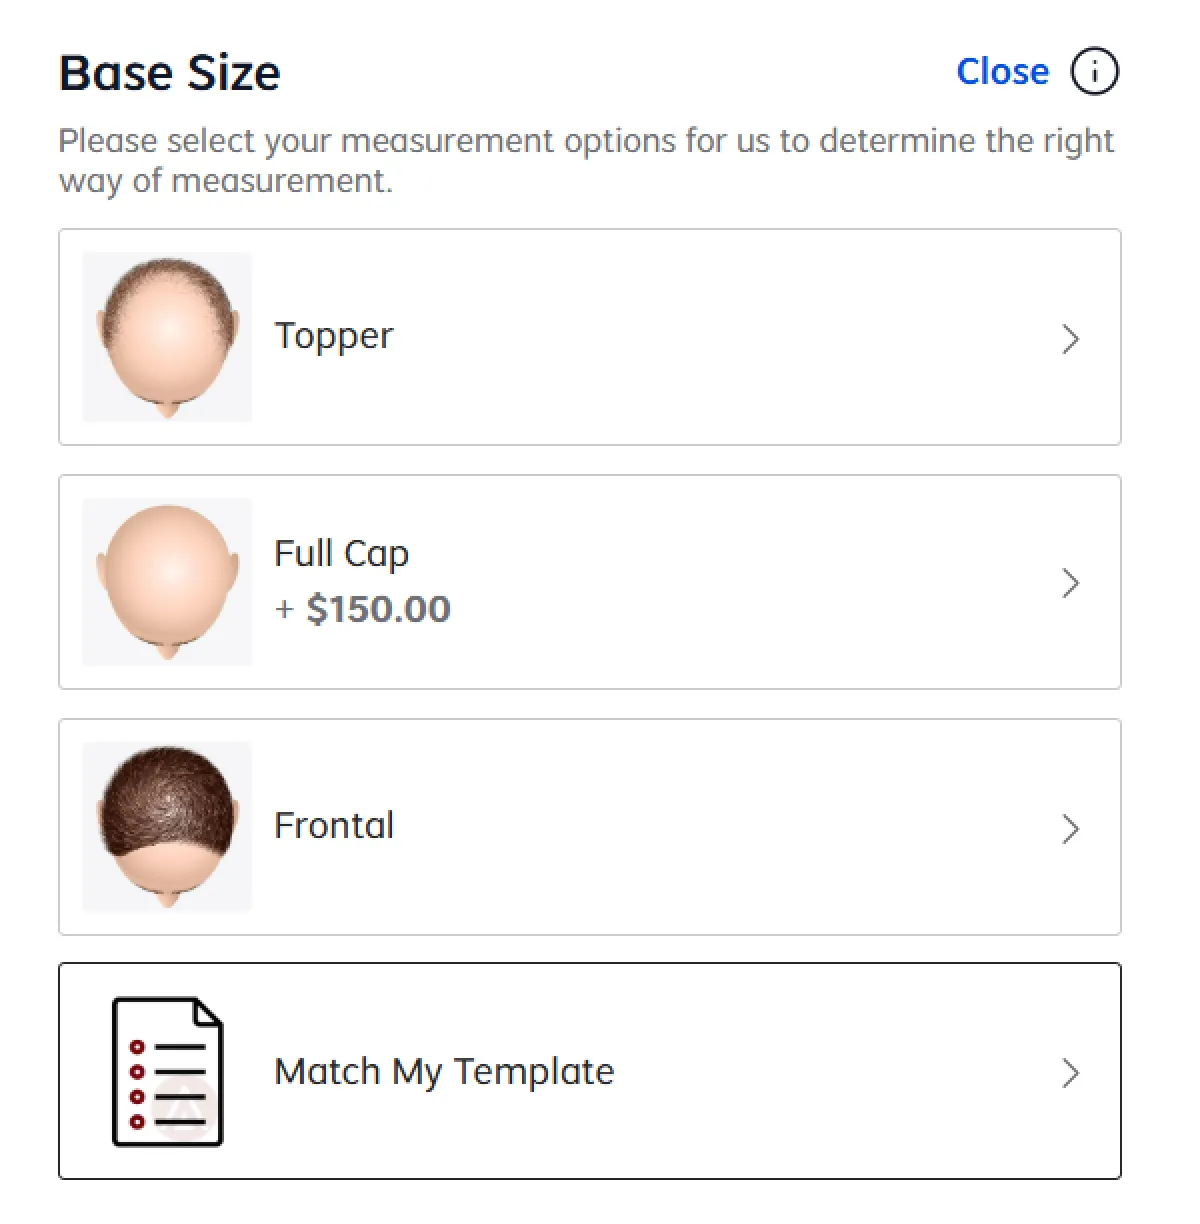
The first thing to figure out is the size and shape of your hair loss area. Most men with hair loss on the crown need a standard topper. Men with a receding hairline may only need a smaller frontal piece. Those with full hair loss will need a full cap system.
The first step to getting a seamless blend is getting the base scalp size correctly. A few centimetres off can leave gaps and make the hair system visible.
Watch this tutorial for how to measure correctly:
The base is the foundation of your hair system. It determines how natural it looks, how breathable it feels, and how long it lasts. Knowing how each base type differs makes it easier to understand what you're ordering.
Lace, skin, and mono are currently the three most popular hair system base materials.
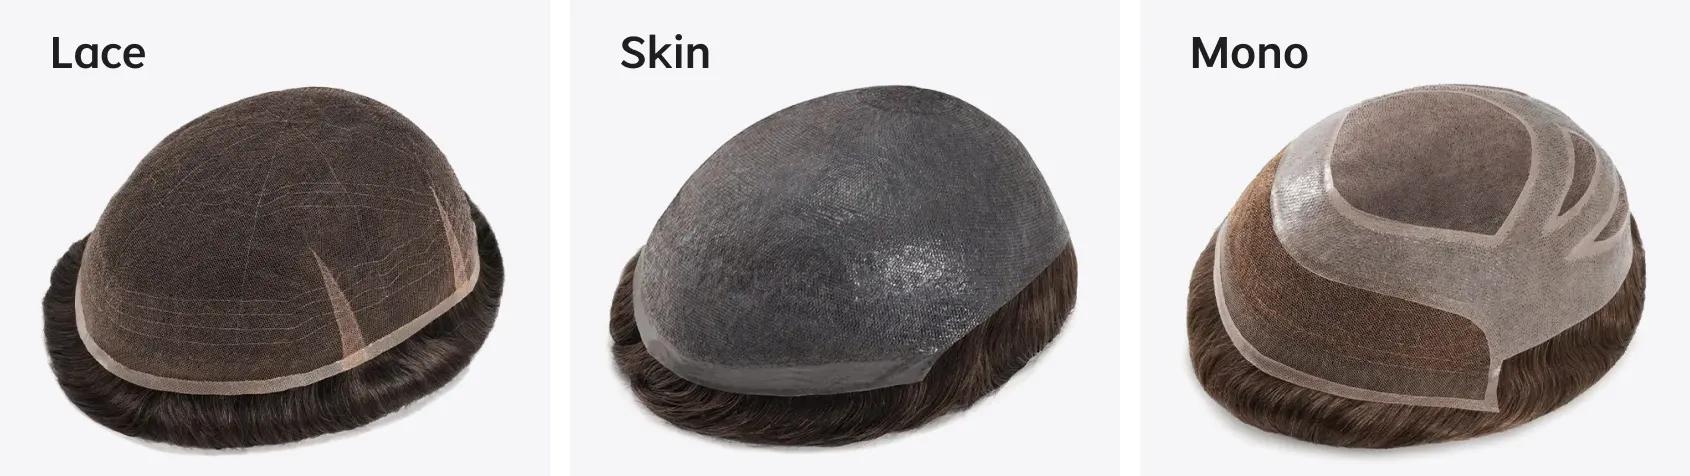
Lace is a fine, net-like material that allows air flow. French lace (more durable) and Swiss lace (thinner, more undetectable) are two major types of lace bases for men's hair systems. Lace creates a super natural hairline and is highly breathable. It is a strong option for men who sweat or live in a hot climate.
Skin (Poly / PU) is made from polyurethane (PU). It's a thin, translucent material that mimics the scalp. The thinnest Ultra Thin Skin base (0.02-0.03mm) is virtually invisible and offers ultimate realism. Thicker options (0.06mm–0.10mm) are more durable, and suit men who prefer a simpler maintenance routine and longer wear.
For a full comparison of all Lordhair skin hair systems, see Lordhair Skin Hair Systems: The Complete Guide to Every Model.
Mono (Monofilament) looks similar to lace, but it's sturdier and feels harder. It is most commonly used on the crown of hybrid systems. Because it doesn't create a natural edge on its own, it's usually paired with lace or skin at the front hairline.
For a full breakdown of the three base types, see Lace vs. Skin vs. Mono: Which Hair System Base Is Right for You?
Other materials that are used for a hair system base include:
Gauze is a thin, silk-like fiber, but it can't be used alone because it doesn't hold structure well enough for hair knotting. It's always combined with polyurethane: a layer of PU is coated onto the gauze, hair is knotted in, then another PU layer is added on top for strength. You'll also see it called skin with gauze or glass skin. On the Lordhair website, it's usually listed simply as "gauze", but the PU is part of the construction even when it's not in the name.
NPU is a three-layer material: lace or mono on the inside, a layer of polyurethane in the middle, and gauze on the outside. It's often confused with plain thin skin (PU), but they're different — NPU is noticeably thicker and more structured. NPU is sturdy and easy to clean, but it doesn't look natural when viewed up close from above. That's why it's rarely used on the crown. Instead, it appears around the perimeter where it acts as a firm bonding surface for tape and adhesive.
Once you've selected a base, you'll need to choose hair details such as color, density, length, and curl or wave type. For the most accurate color match, send Lordhair a hair sample or use a Lordhair color ring. Density should reflect your natural hair before hair loss for a natural blend.
For detailed guidance on choosing a hair system, see the complete Hair System Guide.
AKA ventilation method. This is the method used to tie the hair onto the base. Some methods are more robust, some methods are more invisible than others. Knowing their differences will allow you to make a choice that better matches your expectations.

How does a knotting method make hair stay on a base, but doesn't create any visible knots on your head? Check out this full explanation of wig knotting techniques.
Or watch the video tutorial below.
Stock hair systems are pre-made, ready to ship, and a good starting point for most men. Custom systems are made to your exact specifications but take 2–3 months to produce. The right choice depends on how specific your requirements are and how soon you need the system.
When you browse through the Lordhair product list, you will notice some product names with a hyphen and a letter following the product name. Do you know what the difference is between SuperSkin-V and SuperSkin-VM? Check out the table below for a quick guide to our product names.
| Product Suffix | Meaning |
|---|---|
| -C | This means clips have been sewn onto the base - no glue, no tape, no fuss! |
| -V | This often means that the hairpiece uses the knotless V-looped hair all over. |
| -M | Medium density. Most of our stock hair systems has medium-light density (100%), this has the same base but the only difference is the hair density (120%). |
| -F | This mean it's a Frontal hairpiece, which mainly covers hair loss at the hairline instead of the entire top of head. |
| -FL | Lace front, originally an abbreviation of French lace, hairpieces ending in FL may also be made of other materials, but they are all pieces with lace at the front. |
| -VM | This means the hair system uses V-looped hair all over and medium hair density. |
Stock hair systems are the most straightforward option. They're pre-made, sit in Lordhair's warehouse, and typically ship within 24 hours. Most come in standard sizes with fixed hair specs, but you can still add services to personalize them before they ship.
On the Lordhair homepage, click Hair Systems in the navigation bar to go to the product list. Then you can choose to personalize a stock hair system by base type.
On the product page, select the model you would like to have and whether you want an upgrade to its antibacterial version ZyroSen.


Stock systems come in standard sizes. If your hair loss area is smaller, you can either trim the base yourself or let Lordhair cut the base for you. If your hair loss is larger than a standard topper, a custom system is the better fit.

Choose hair color and hair density on the product page. Your hair color and density should match your bio hair for a natural blend.


On the product page, you can add hair style services before checkout, which enables you to wear the hair system straight out of the box. Haircut, styling, perm - all these services are covered in detail in the Additional Services section below.

Once you've made your selections, add the system and any services to your cart and proceed to checkout. Lordhair accepts a variety of payment options: Debit/Credit Card, PayPal, Klarna, Apple Pay, Google Pay, West Union, MoneyGram, and Wire Transfer. Stock systems ship within 24 hours on weekdays. Additional services will add 1–7 business days, depending on what you've chosen.
If you are not sure what to choose during the process, try Lordhair AI Search. It can give you practical suggestions and help you narrow down your options.
Custom hair systems are built to your exact specifications. Nearly every detail can be tailored: base type, base size, base design, hair color, density, length, curl, and hairline shape. This is the best option for men with specific requirements that stock systems can't meet, or those who want a perfect fit from day one.
Go to the custom hair system page and click "Create My Custom Hair System" on the banner. You'll start by choosing the base size. You can choose a topper, a full cap, or a frontal to customize its size. Or you just customize the base size to match your temple.
Accurate measurement of your hair loss area is the most important part of a custom order. Even a small error in sizing can result in a system that doesn't sit right or leaves gaps at the edges. We will introduce how to make a base template for accurate measurements in a separate section.
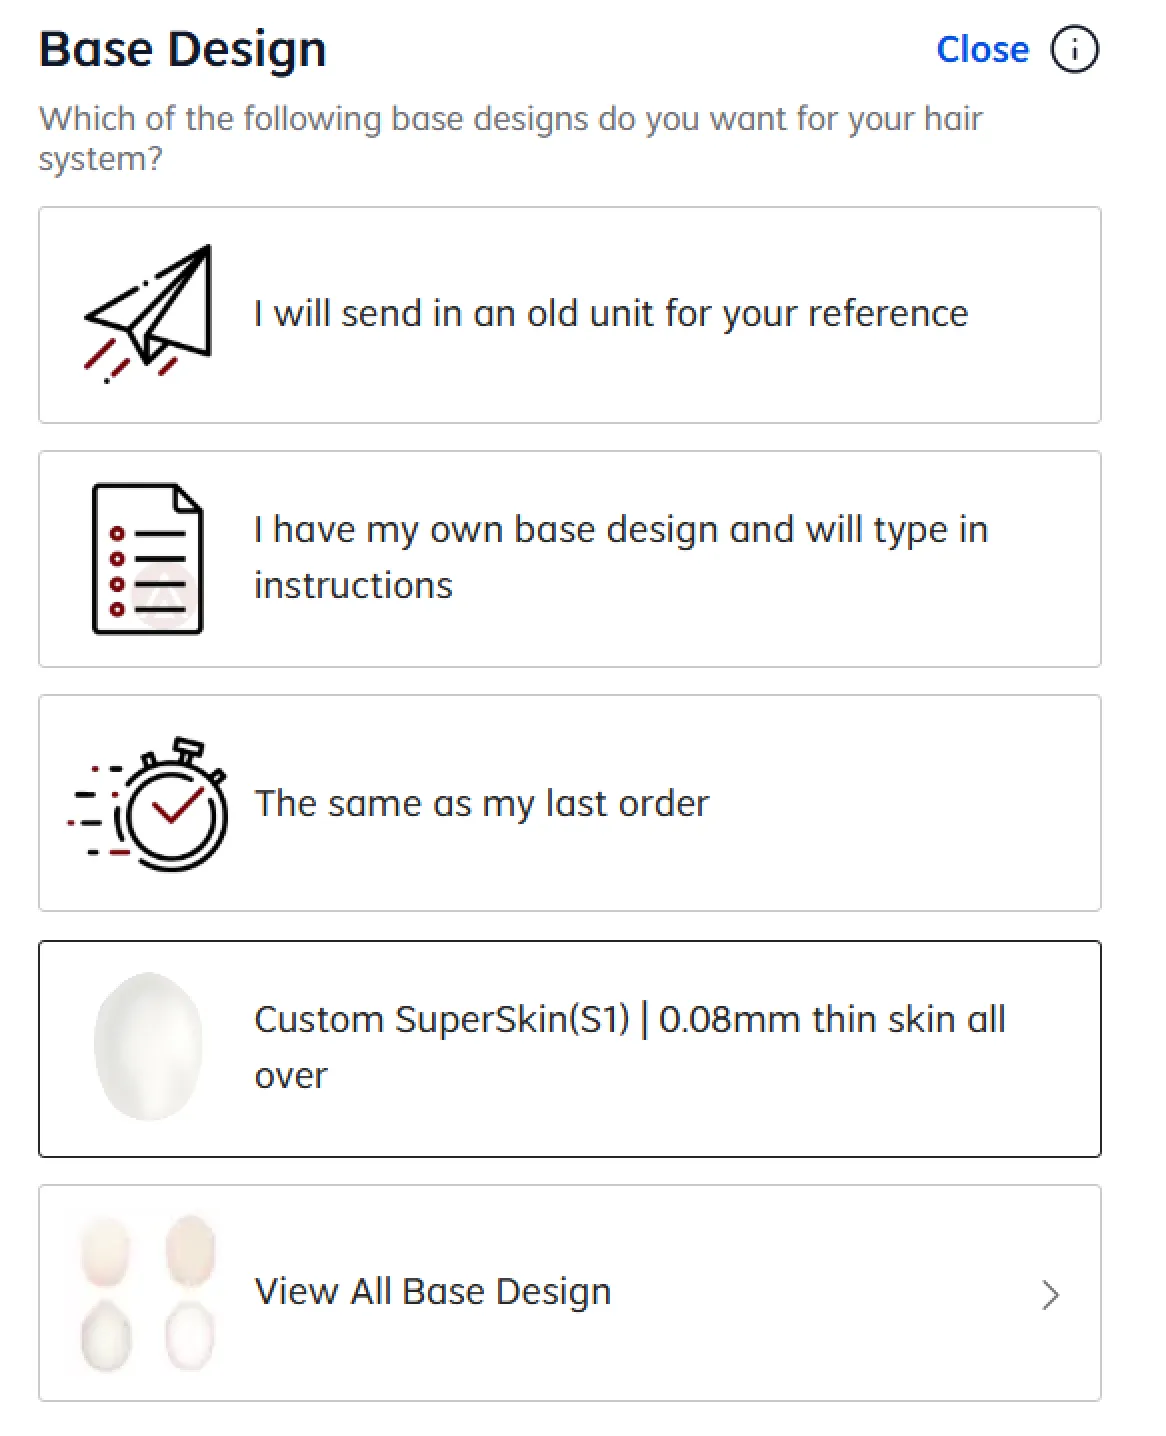
There are four ways to customize a base design:
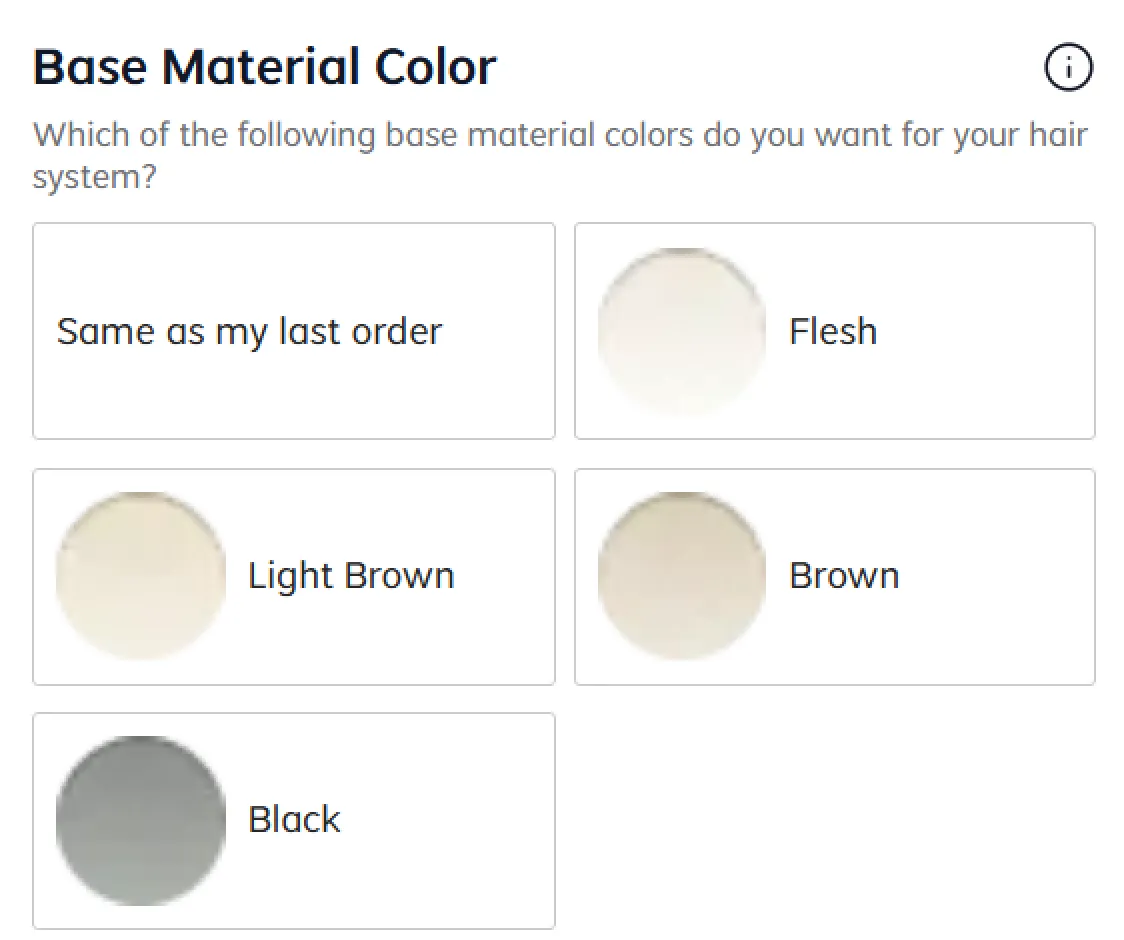
Choose a base material color that fits your scalp tone. Lordhair offers options from flesh, brown, to black.
Once your base is set, you'll need to fill in the hair details. These include:
View detailed explanations of each hair system feature.
Review all selections in the customization portal, and if you have any notes or special requests, you can include them in the additional instructions. Add the system to your cart, and complete checkout. Production starts once all details are confirmed and payment is received.
Most custom systems take 8–12 weeks to produce; rush service requires a shorter time of 6-7 weeks. If you're working to a deadline, contact customer service before ordering to confirm timelines.
A base template is a mould of your scalp that captures the size and shape of your hair-loss area. Unlike taking measurements by hand, a template accounts for the contours of your head that a flat measurement can't achieve. For a custom hair system, it's the most accurate way to ensure a perfect fit.
Below is an example of template moulds:
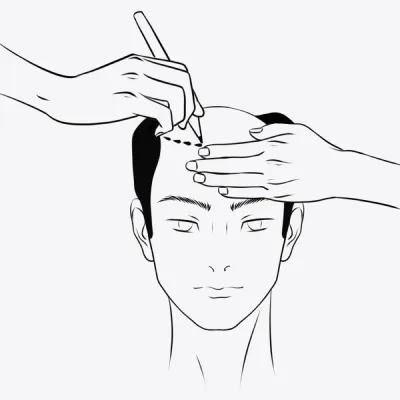
Outline a natural-looking hairline on your skin using a makeup pencil, starting from temple to temple. To find the right placement, rest three or four fingers on your forehead; your hairline should start where your index finger lands when your eyebrows are raised. A hairline with deeper recession appears more natural. If necessary, adjust the line with rubbing alcohol.
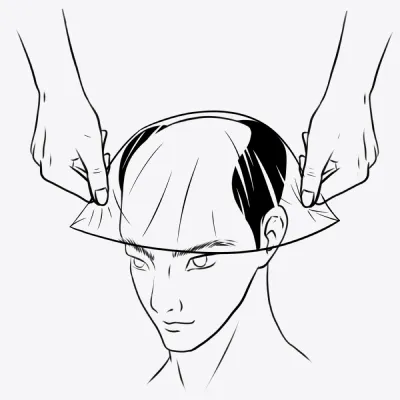
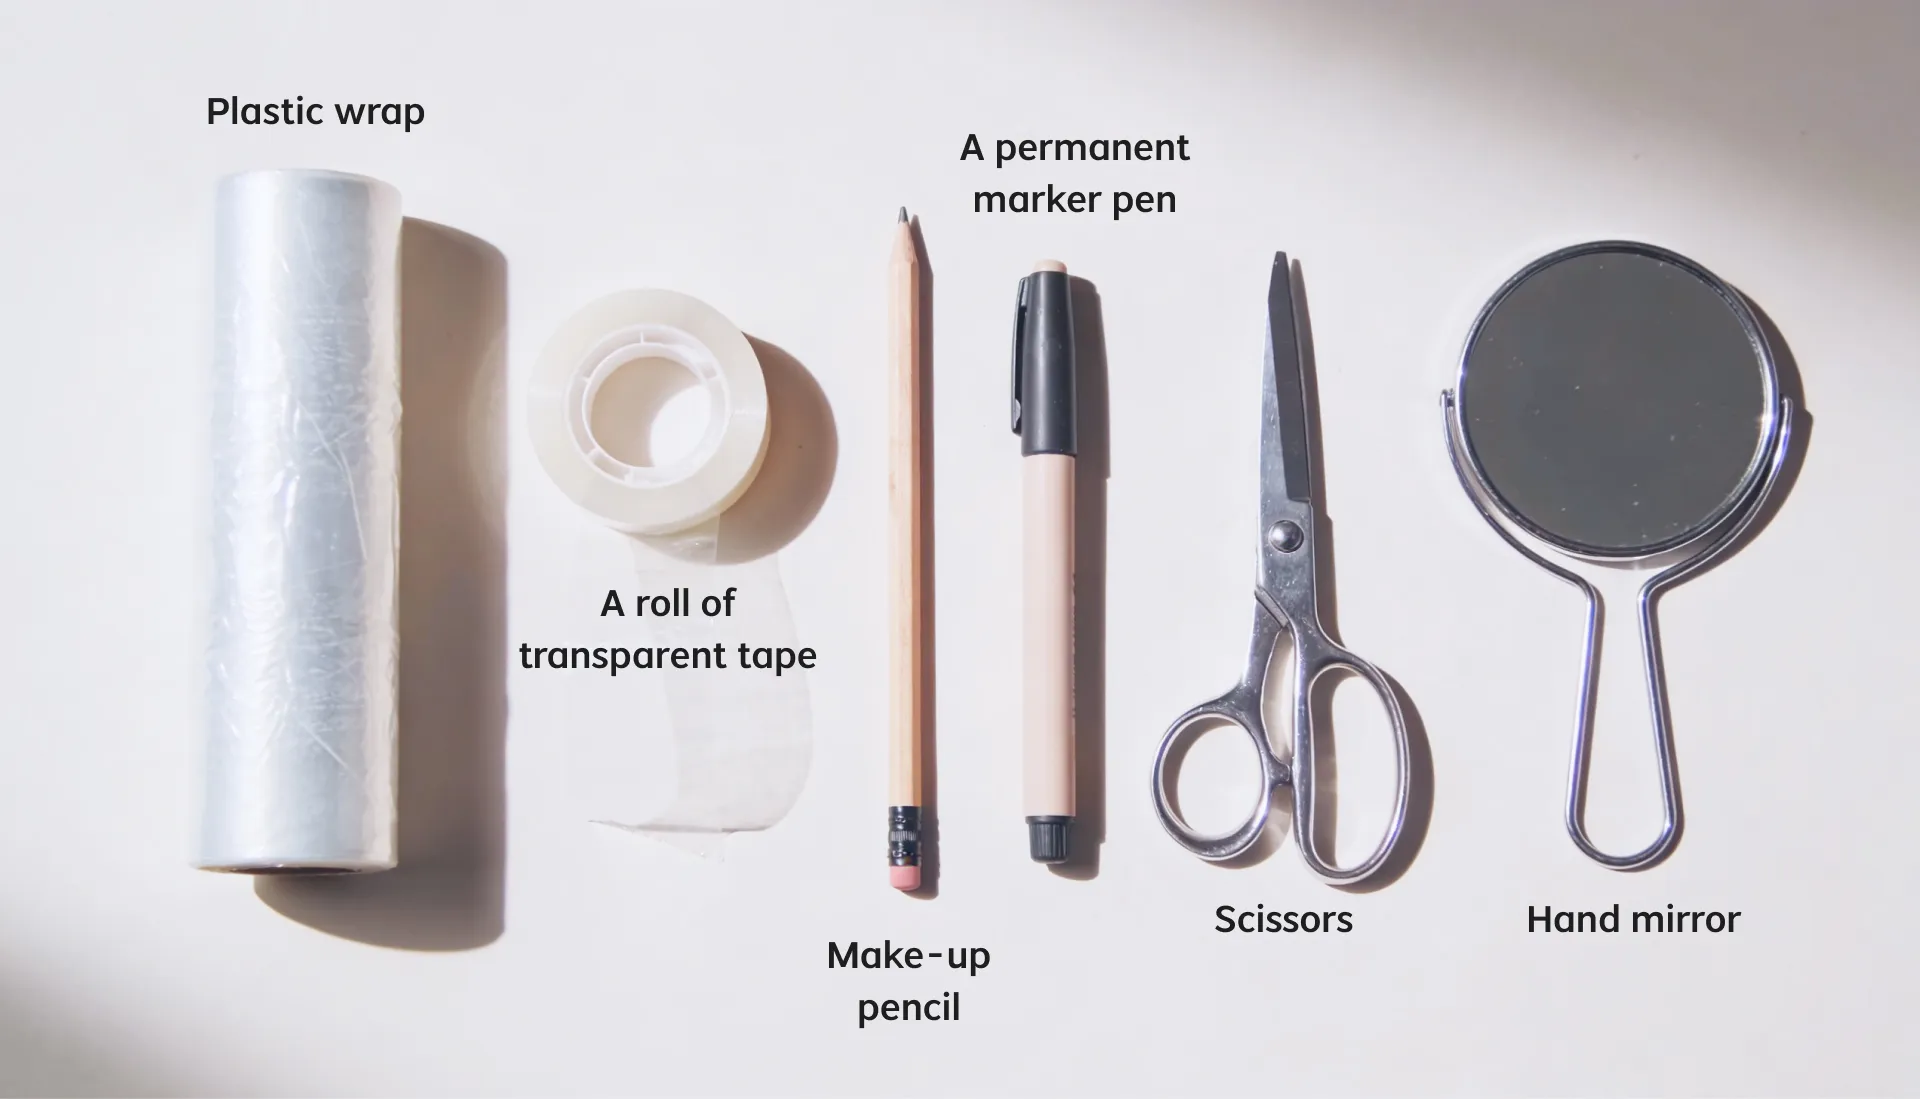
Spray some water on your scalp. Then, cut a strip of plastic wrap, wide and long enough to cover your head and tie under your chin like a bonnet. After placing the wrap tightly on your head and securing it, use transparent tape to outline the bald area on your scalp. This helps in determining the exact area for the hair system.
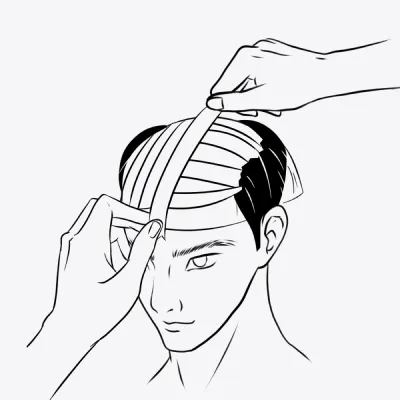
Apply three layers of tape: the first from front to back, the second side to side, and the third again from front to back. It's important to keep the plastic wrap tied under the chin throughout this process until completion.
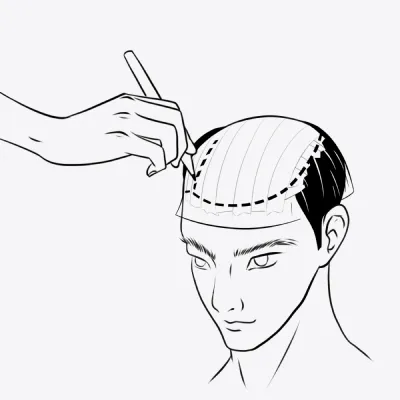
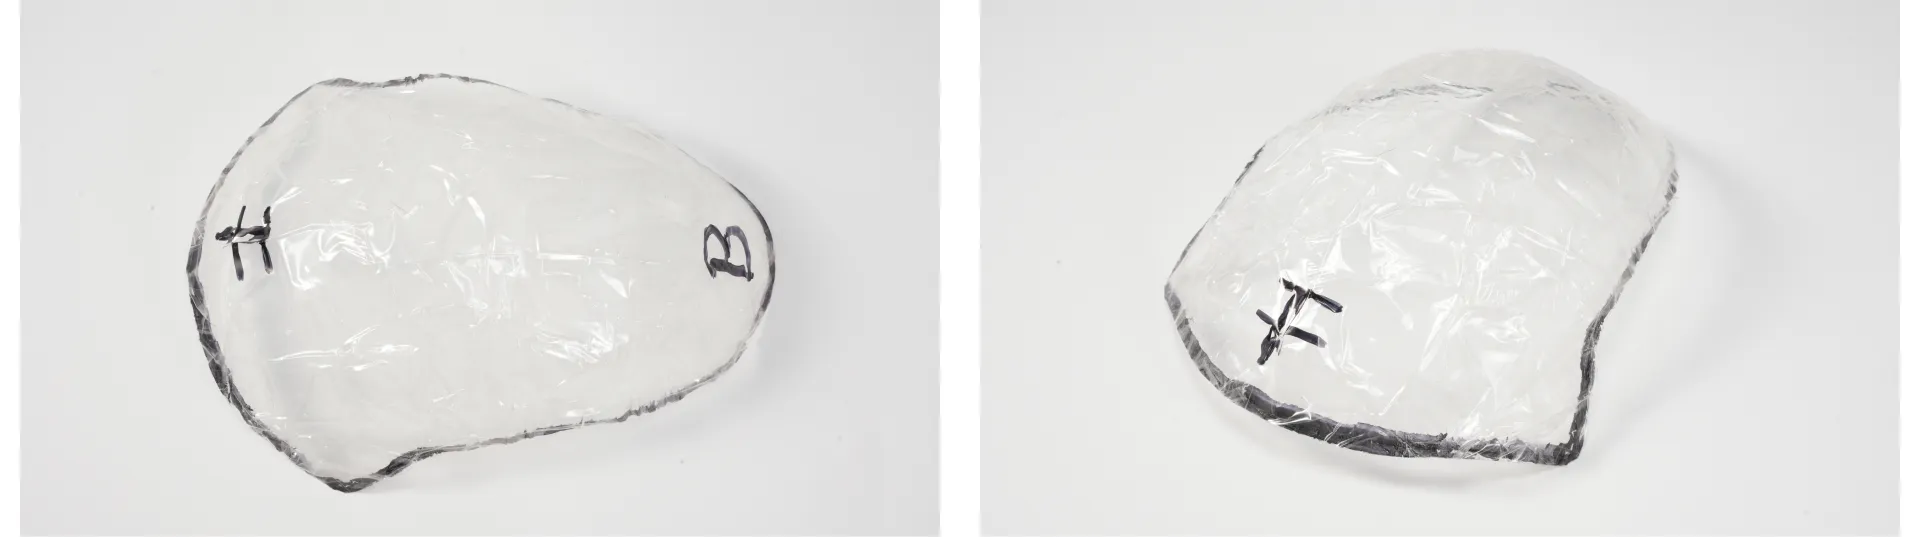
While the plastic wrap is on your head, use a permanent marker to trace the hairlines on the tape template, covering the bald area. This creates the shape for your hair system base. Indicate the desired hair direction and, if needed, draw a parting line from the back crown to the front hairline. Mark the template with “F” for front, “B” for back, and add your name and order number for identification.
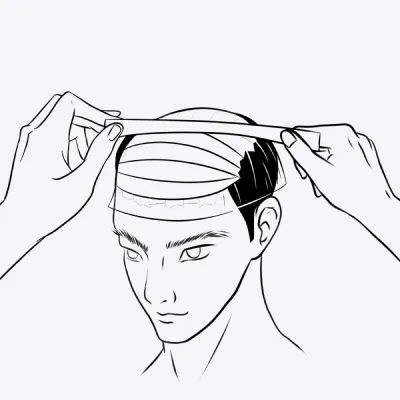
Upon finishing marking the tape template, place one more layer of the transparent tape going from side to side. This should seal and protect the markings. Now your template is complete.
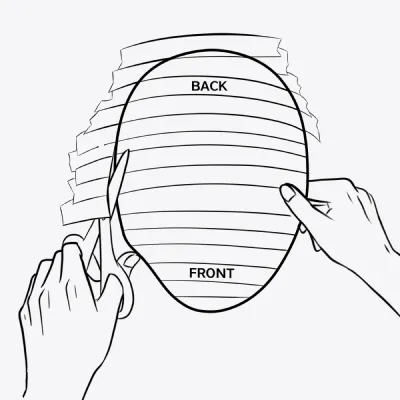
After drawing the template on your head, carefully remove it, trim excess plastic along the drawn perimeter, and check it against your bald area for correct size and shape. This completes the creation of your tape template.
Still not sure how to make a base template? Lordhair's Head Template Maker makes the process easier. Watch the video below to see how to create a template using a Head Template Maker.
Color is one of the hardest things to get right without a physical reference. Photos and monitor screens change how hair looks — what appears light brown on screen might be something entirely different in person. A real hair sample removes that uncertainty completely.

For the best color match, it's ideal to provide a small bunch of hair, around 2-3 inches in length. The more hair provided, the easier it is to determine the correct color.
If your hair is the same color all over, please just provide one sample. However, if your hair varies in color (like more grey on the sides), take samples from 3-6 different areas: the front hairline or bangs, the top front, the crown, temples, sides above the ear, and the center back of the head. This ensures an accurate representation of all your hair colors.
Below is an example of hair samples:
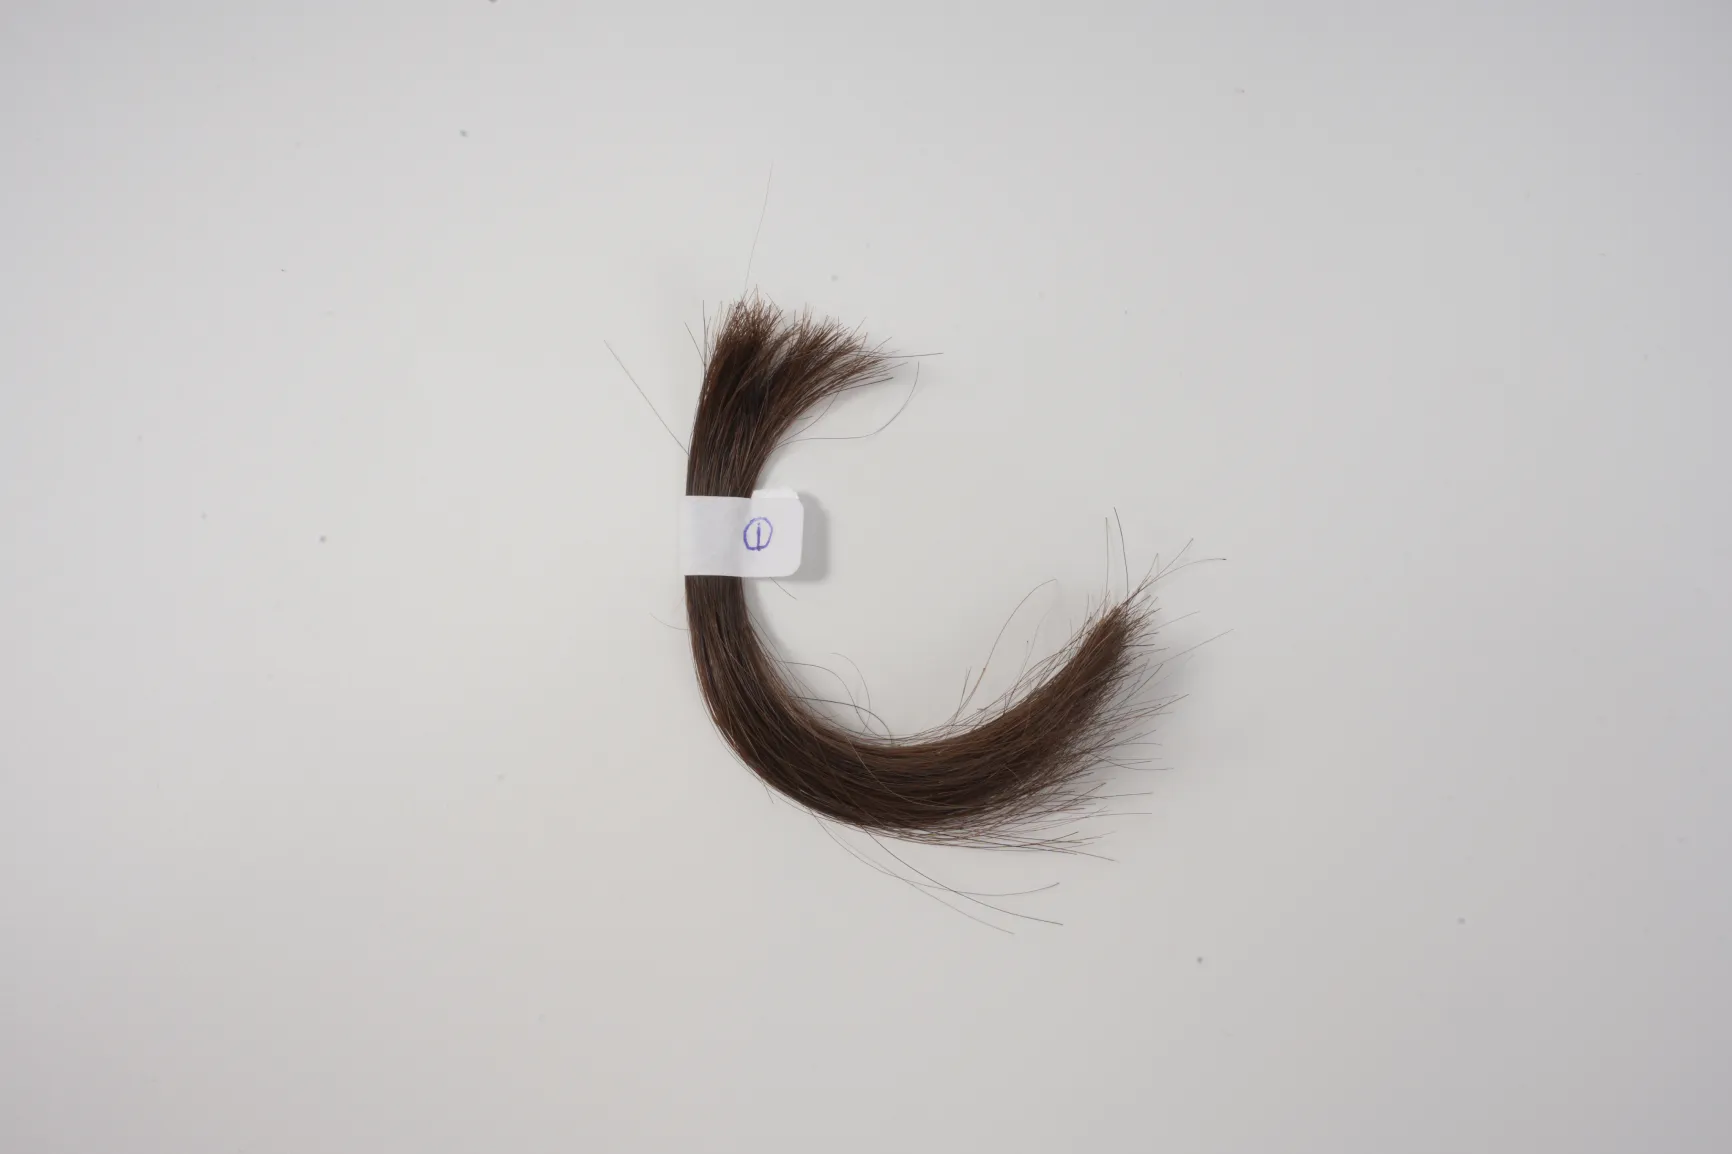
NOTE: When providing hair samples, cut from each specified area and label them according to their origin (e.g., front, top, sides, etc.). It's important to use clean hair for the samples, as dirty hair might not accurately represent its true color.
If your hair is too short to cut a proper sample, you have a few options:
If you're fully bald, you have complete freedom to choose any color. Lordhair's team can help you select something that suits your skin tone and looks natural.
There are three ways to send us your base template and hair sample:
You can send your template and samples to Lordhair directly. Normal postal services can take more than a month to reach us. If you want a faster and cost-effective solution, we recommend that you try the following two methods.
If you're based in the US or UK, you can send your template and samples to Lordhair's local office instead of shipping directly to our head office. Staff at both offices collect and forward everything to Lordhair together, which is faster and more cost-effective than sending internationally on your own.
Contact Lordhair customer service to get the current office address for your region and any specific packing instructions.
The Lordhair Pick-up Service is the easiest way to send us your base template and hair sample. You don't even need to leave your house! Simply add the add-on service to your cart at checkout, and we will arrange your pick-up.
With this service, we will pay the courier charge first and then charge you the shipping cost.

Once we receive your hair system base template and hair sample, we will keep them on record, so you can refer to them for every order in the future.
When you purchase a stock Lordhair hair system for men, you don't need to stick with the as-is, out-of-the-box hair system. You can make slight alterations to your ready-to-wear hair system that make it more personal. These include the cutting & styling of your hair system, cutting the base down to match your hair loss pattern, perming the hair to curl, amongst many other additional services.
Let's discuss all the additional services available with Lordhair.
Imagine you've selected the perfect base and hair, and it's being shipped to you. Once it arrives, you have to wait half a day for a haircut at a salon, as you can't wear it on your head straight out of the box.
No worries, the Lordhair haircut Service saves you hours of waiting, getting the hairpiece ready to wear upon arrival. What's more, a salon fit & cut can cost $100+, but a Lordhair haircut is just $40. That saves you more than half of the price.


Lordhair provides a wide range of men's hairstyles to meet different users' needs. Here is the collection of all Lordhair hairstyles. For detailed guidance on how to style a hair system, read the complete Care & Style Guide.
If you are worried about whether a hairpiece will look good on you, the Lordhair AI virtual try-on tool will help. Upload your photo, and you will get a realistic preview of the result on your own face.

If your hair loss area is smaller than the standard base size, Lordhair can trim the base down to your measurements before shipping. To add it: go to the product page and select your measurements under "Cut to Size".
Not all systems can be cut to size. Systems with a PU perimeter (like Neo) have limitations because cutting can remove the perimeter material. Contact customer support before ordering if you're unsure.
The short answer is yes, but it may not be a good choice for new users, as you have a higher risk of damaging the base.
If you choose to cut your toupee yourself, you'll want to be careful and understand the process fully before cutting it. The video tutorial below shows what you need to know to cut your hair system base down to size at home.
If you want curly or wavy hair that lasts the full life of the system, Lordhair's perm service sets the curl before shipment. Options range from a subtle body wave to a tight Afro curl.
For stock systems, add the perm service on the product page under "More Services". For custom systems, select your curl type in the customization portal under "Curl and Wave".
See all the Lordhair curl & wave options.
If a stock system comes in a density that's slightly heavier than you need, Lordhair can thin it down by 5% or 10% before shipping. A medium system (120%), for example, can be reduced to 110%.
Hair systems are produced with a small excess border around the edge — this is intentional, as it protects the hairs at the perimeter during production and shipping. Before wearing, it needs to be trimmed away. You can do it yourself at home, or add this service. Lordhair trims the excess edge for you at no additional cost. If you choose our haircut/cut-to-size service, we will trim these excess edges by default.
Have you noticed any of these issues with your hair system?
If your hairpiece corresponds to any of the above, Lordhair hair system maintenance & care service will fix them for you. It is as simple as sending your hair system to us. We will repair it for you and send it to you, good as new.
In many cases, hair system problems come from improper daily care. The Lordhair 3R Hair System Maintenance Collection is specially designed for hair systems, helping keep the hair soft, manageable, and natural-looking for longer.

If you prefer not to use glue or tape, Lordhair can sew clips onto your system before shipping. This is a good option for men who want to remove their system daily, or who still have some hair on the crown they don't want to shave.
Options to get a clip-on hair system:
Check out how to clip in a clip-on men’s hair toupee with celebrity hair stylist Aaron O'Bryan
If you prefer to receive your hair system and customize it yourself, you can buy wig clips and sew them on by yourself. This may be quicker if you need your toupee hairpiece ASAP.
Here is the tutorial on how to sew clips on a toupee perfectly.
For hair systems orders that require Lordhair's additional services, an additional 2-7 working days will be needed for shipping.
Still not sure which Lordhair service you need? Our expert team is here to help. Contact us for free advice, and we'll recommend the right option based on your needs.
Production time is the time it takes to make or prepare your system. It starts only after all order details are confirmed and payment is received. It does not include time spent on consultations, sending samples, or resolving order queries.
Lordhair ships via DHL, FedEx, and UPS to most countries. Delivery typically takes 5–9 business days. Exact timelines depend on your location and local customs.
Shipping is free worldwide for all hair system products. For orders that contain only accessories (no hair system), shipping costs $29.90 for packages under 0.5kg, with $10 added for each additional 0.5kg.
| Shipping Day | Delivery Time | |
|---|---|---|
| Stock Hair System (no service) | 24 hours on weekdays | 5-9 working days |
| Cut To Size | 2-3 working days | 8-12 working days |
| Cut & Style | 5-7 working days | 10-14 working days |
| Cut To Size + Cut & Style | 5 -7 working days | 10-14 working days |
| Perm | 7 working days | 12-16 working days |
| Custom system | Standard 8–12 weeks; rush service 6-7 weeks | Some complex orders may take longer |
Some countries charge a customs fee when the product arrives, but it depends on the country's tariff policy. Customers are responsible for paying any customs clearance fees. If you have questions about import duties, contact your local customs authority, or reach out to Lordhair's support team for guidance.
To make sure your package arrives without issues, please confirm that your shipping address and phone number are accurate. Carriers will sometimes call to arrange delivery; a wrong number can delay the delivery or return your package.
If a package is returned due to an incorrect address or unanswered phone calls, any additional shipping costs or customs fees will be the customer's responsibility.
If you need to track or follow up on a delivery, here is the contact info for our shipping partners:
| Carrier | Customer Service |
|---|---|
| FedEx – US / Canada | +1 800-463-3339 |
| FedEx – UK | +44 2476 706 660 |
| FedEx – Australia | +61 13 26 10 |
| DHL – US | +1 800-225-5345 |
| DHL – UK | +44 844 248 0844 |
| DHL – Canada | +1 855-345-7447 |
| DHL – Australia | 13 14 06 |
For other countries or more options, visit fedex.com or dhl.com.
Yes. Lordhair offers free returns on first stock orders. You can apply for a return within 30 days of receiving your order for any unused item. If the stock hair system doesn't fit properly, contact customer service to arrange a free doorstep pickup return.
Yes, but refunds are only available for unworn and unaltered custom hair systems. Any approved returns must be sent back within 30 days of receiving the item, and are subject to a 50% service fee. See details in the Exchange and Return Policy.
To a degree, yes. You can add haircut and styling, perm, cut-to-size, density thin-down, and clips to any stock system. If you want full control over the base and hair specs, a custom system is the better route.
Measure your hair loss area from front to back and side to side. If you're unsure, watch this video to learn How to Take Head Measurements or contact Lordhair's customer service team for guidance.
Hair can shift slightly during shipping. If the result looks noticeably off, please contact Lordhair customer service, and the team will guide you to adjust the hair system for your desired look.
You can track your order using the courier tracking number sent in your order confirmation email or from your Lordhair account. If you didn't receive a tracking number or it's not working, please contact Lordhair Customer Service for help.
Yes, we ship to most countries in the world. Shipping is free when you order a hair system. Hair System Accessories weighing less than 0.5kg will incur a shipping charge of USD 29.90. Each additional 0.5kg will cost an additional USD $10.